How to Know When a Site Is Ready for a Timber Floor Installation?
Filed under: Blog
Comments: Comments Off on How to Know When a Site Is Ready for a Timber Floor Installation?

What needs to be done before the wood planks get laid down.
Building or renovating a home or development is an exciting project, especially once you’ve selected all your fittings and are seeing your vision come to life. However, works not being executed in the right order can ruin the process, possibly leading to damage and defects.
This is especially the case when it comes to installing a timber floor. Natural wood, if not cared for appropriately including during the construction period, can come away with dents, scratches or stains.
But not to worry, we have compiled a straightforward guide to the perfect conditions for getting your floor installed.
Complete these essential works first
Our checklist, as followed by our experienced project coordinators, takes the guesswork out of knowing what should take place before bringing in a timber floor.
- Cement screeding should be dried and level: as this will form the base of your floor
- Other types of flooring should be laid beforehand, at the desired height: Because wood as a flooring can accommodate slight adjustments in height, for example through sanding down, it should be the last type of flooring installed.
- Any sliding tracks for doors should already be installed: as doing so after the timber floor is in can cause damage to the wood
- All waterproofing works and wet works should be completed: For example, for the kitchen and toilet. Windows and doors should also be in. This is because water seepage can damage the wood and even cause it to change colour.
- Ceiling and wall plastering and painting should be done: otherwise, fragments of plaster and drops of paint are liable to fall on the floor and stain it

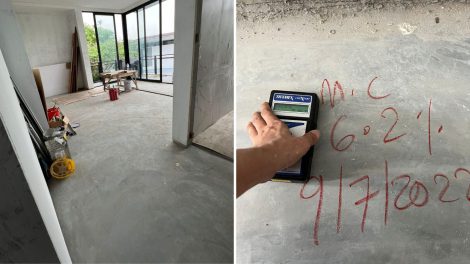
Pre-installation: cement screed sub-floor clean, dry and ready for timber installation (left); a measuring tool to ensure that the cement floor underneath has a low enough moisture level for timber installation (right)

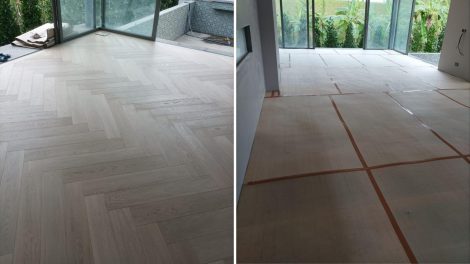
Post-installation of timber floor (left); temporary protection post-installation in the event that other works are not completed yet (right)
Another reason to get these works out of the way first is that they tend to involve tools and machinery that may cause scratches to the wood.
However, if it’s unavoidable for other works to take place after the floor is in, contractors should make sure to provide protection for the floor to avoid any dents or damage.
Make sure the floor is dry enough
If it wasn’t already obvious, water and wood do not get along. So much so that there are specific measurements of moisture that our coordinators look out for before they okay a floor installation. Using a specialised meter, they ensure that the moisture level in the cement sub-floor is not more than 6%.
Should the moisture exceed this level, it can cause the wood to be “wavy” or buckle when installed.
Ensure that site is clear and clean
You’ll want to minimise the risks of any debris or construction materials falling onto and ruining your floor. So before the installation begins, make sure that as far as possible, the site is clean and clear of any tools or materials.
Conclusion
Installing a timber floor is not a walk in the park, requiring knowledge and expertise. Arming yourself with this guide will help you know the major considerations to look out for before your floor goes in – after all, you’ll want it to last and look its best for years to come.
Have a question about timber floor installation or need help to remedy your floor situation? Have a look at the services that we offer or chat with us on our website.

